Apply two beads of roofing cement to attach the top layer shingles to the bottom layer shingles.
Roofing procedure valleys.
Away from the valley center just as i did with the closed cut valley.
Your choice of valley installation method is critical because when improperly installed valleys are risks for serious leaks.
When i ve finished shingling the first roof plane i snap a chalkline 2 in to 3 in.
Start by laying all shingles on one side of the roofing and stretch it across the valley.
Essentially there are three main ways to shingle a roof valley.
Water collects in a valley to flow off the roof.
A roof valley is formed where two roof slopes meet.
Install an underlayment centered in the roof valley.
Then i install a line of shingles up the valley with the top edge aligned with my snapped line.
Recommended procedures of basic valley flashing installation.
The open woven and closed cut methods are demonstrated.
Woven closed cut and open.
Fasten the shingles about 6 inches away from the centerline on both sides.
In the past i ve used several different methods to prepare a valley including lining the valley with aluminium coil flashing or roll roofing and even cementing together layers of 30 felt paper with asphalt roof cement a messy job.
Stretch it about 12 inches across the centerline.
Use four roofing nails per shingle as indicated on package instructions six nails in high wind areas.
Also apply cement to attach the top layer shingles to each other see steps 5 and 6 in open metal valley above.
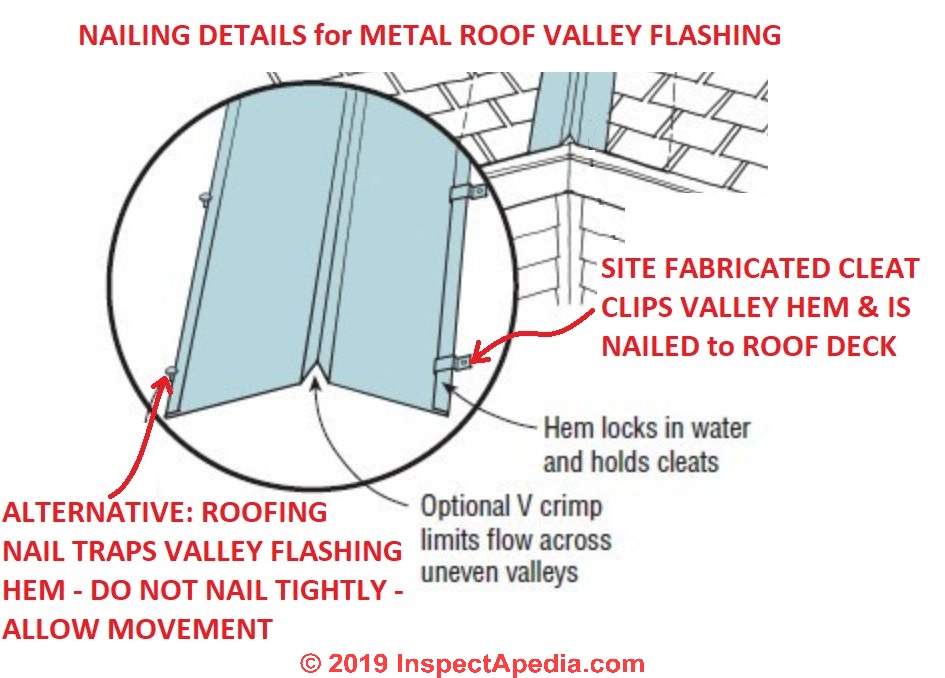
Then install a non corrosive metal valley flashing of 24 minimum width lap successive sheets of metal flashing a minimum of 12 inches and seal laps.
Tear off the old shingles.
The lowest of these valley shingles is cut back at an angle in line with the lowest course line.
Once this course is laid you can begin snapping horizontal chalk lines up the roof to ensure straight rows.
Draw a 2 inch self stick flashing down the center.
Next i smear roof cement a couple of inches away from my snapped line.
Cut corners and apply cement dub cut the top layer shingles see step 4 in open metal valley above.
Apply an approximately 3 inch.
Of the shingle tabs where the bottom edge of the tab meets the top of the cutout.
Architects often prefer closed valleys to open valleys as they feel that it gives a home better architectural appeal.
The reason that many roofers like an open valley is that they feel that tree leaves and needles will more easily slide down or wash down an open valley when it rains.
Make sure to expose 5 in.